How to MIG Weld Stainless to Mild Steel: Step by Step
MIG welding (GMAW) is an excellent process to weld stainless to mild steel. MIG is the easiest process for beginners and home welders, offering good results with low experience. It’s also great for thin metals.
But there are some things to consider. Because one part is stainless, you must use stainless wires and specific shielding gases. Both are expensive.
Furthermore, the stainless part is more sensitive to welding heat than the mild steel. So, if you overweld it, you risk warping, blowing through, losing corrosion resistance, and even worse, bead cracking.
Moreover, stainless steel is four to five times more expensive than mild steel. It would help if you already have some welding experience to avoid damaging the stainless part.
Weldpundit already has an introductory article on welding stainless steel to carbon steel.
Table of Contents
- 1. Identify the steels to know with what you are working with
- 2. Select the ER309 wire for dissimilar metals
- 3. Select the proper shielding gas for the transfer mode you want
- 4. Gather the equipment you need
- 5. Clean both metals to avoid defects
- 6. Prepare a tight symmetrical joint
- 7. Use chill bars and clamp the metals
- 8. Set the correct voltage and wire speed
- 9. Set the inductance
- 10. Stainless to mild steel welding needs a modified working angle
- 11. Tack the metals to avoid distortion
- 12. Tips for MIG welding stainless to steel
- 13. Clean the stainless part and bead after welding
Now let’s see how you can weld stainless to steel with a MIG welder while maintaining good corrosion resistance.
1. Identify the steels to know with what you are working with
It is easy to tell between stainless and mild steel.
First, you can check the external appearance. Stainless steel is rust-free, has a silver-gray color, and never has mill scale on it. Mild steel often has rusty parts and a light-gray color. If it is covered by mill scale, it has a black-bluish color.
A spark test is an excellent method to identify metals. But you must have identified sample metals to compare them with your workpieces. To do a spark test, you grind the metals and observe their sparks.
Most stainless steel grades generate long yellow sparks without forks. Mild steel generates long yellow-reddish sparks with forks. Forks are patterns resembling a fork where the spark ends.
Identifying the type and grade is harder.
Stainless steel
There are three basic stainless steel types:
- The most common stainless steel grades, such as the 304 (or 18/8) and the 316, belong to the austenitic type. Most cookware and food containers are made from 304 steel. It’s the easiest type to weld.
- But you might have ferritic stainless steel. It’s used for decorative or heat-resisting components. This type becomes brittle when you weld it.
- Finally, you might have martensitic stainless used for small cutting tools and machinery components. This type is the hardest to weld and needs preheating and further post-welding heat treatment.
By following this guide, you can weld ferritic and martensitic stainless to mild steel without preheating.
But only if you:
- Use proper austenitic wire, such as the ER309.
- Weld non-critical projects that will not endure high mechanical or thermal stress.
- Don’t have to do any further heat treatments on martensitic steel.
Identifying between austenitic and the other two types is easy since austenitic is not magnetic, but the other two types are.
If you are lucky, you can find exactly the grade, since many stainless components have it imprinted on them. If there isn’t one, you need chemical tests or an extremely expensive XRF Spectrometer.
For noncritical jobs, further identification is not necessary, since the ER309 wire is great for dissimilar metals.
Carbon steel
While mild steel is by far the most common steel and the easiest to weld, you might stumble upon the other two types.
The medium-carbon steel and the high-carbon steel. Both are hard to weld because they tend to crack after welding.
Weldpundit has a detailed article on how to identify metals that includes photos with austenitic stainless and mild steel sparks.
Since the austenitic 304 stainless steel is the most popular, the following steps are about welding this grade to mild steel. Now, let’s see what equipment you need.
2. Select the ER309 wire for dissimilar metals
Selecting the proper wire is the most important thing to get right when welding stainless to mild steel.
The best MIG wire for welding stainless to mild steel is the ER309L. It has a high chromium and nickel content, but a low carbon content. It also has a small amount of ferrite that prevents hot cracking. The final bead is great-looking with high strength, ductility, corrosion and heat resistance.
Let’s see what ER309L indicates:
- ER means it is an electrode in the form of a wire.
- 309 indicates the austenitic stainless grade with 23% chromium and 13% nickel and a ferritic addition to counter hot cracking. Hot cracking appears when a bead with poor chemical composition cools down unevenly.
- L that it has an ultra-low carbon content. 0.03% instead of 0.08% that typical ER309 has. This helps to prevent carbon contamination and avoid corrosion and cracking problems. If the stainless part is also ultra-low carbon, an ER309L wire is necessary.
There is also the ER309LSi variation with a higher silicon (Si) content. Silicon makes the puddle more fluid, resulting in a flatter and better-looking bead. This saves post-welding effort and costs to grind the bead if looks are important. It’s a great choice when welding with the short-circuit transfer mode.
For most stainless to mild steel jobs, a simple and easy-to-find ER309L wire is enough.
The ER312 wire is designed for unknown or hard-to-weld dissimilar metals, for example, martensitic stainless to high-carbon steel.
It is a bad idea to use typical steel wire such as the ER70S-6 to weld stainless steel to carbon steel. The final bead will:
- Have no corrosion and high heat resistance.
- Have lower strength.
- Be brittle and may crack under mechanical or thermal stress.
A common steel wire will also damage the expensive stainless component.
Things to consider when using stainless wire
Stainless steel wires have some difficulties:
- Welding with a stainless wire generates unhealthy fumes. Ideally, you need local ventilation to capture the fumes and use a welding respirator.
- To do the perfect job, the stainless wire must not come in contact with mild steel. That includes the parts the wire goes through, especially the liner. Use a dedicated liner or, even better, a spool gun.
- These wires melt faster even if the amperage is lower compared to a typical wire. Therefore, you always use a faster welding speed.
3. Select the proper shielding gas for the transfer mode you want
Mig welding uses a cylinder with shielding gas to protect the arc and the puddle. It is important to select the correct gas to avoid defects and preserve the corrosion resistance of the stainless bead.
You select the gas according to the metal transfer mode you want to weld with.
Stainless wire requires a tri-mix gas when using the short-circuit transfer mode to offer the best results.
The short-circuit transfer is ideal for the stainless part since it releases low amounts of heat. This mode welds in all positions. Small and hobby 120V machines can only weld with this mode.
A tri-mix gas consists of:
- 90% helium (He).
- 7.5% argon (Ar) and
- 2.5% carbon dioxide (CO2).
If you have a 120V welder, you can weld 18ga (1.2 mm) up to 3/16″ (4.8 mm) thick metals. With a 240V welder up to 1/4″ (6.4 mm). For thicker metals, you should use the spray mode.
You should avoid welding with 75/25 gas. The bead will be narrow, tall, and ugly. Furthermore, the corrosion resistance will drop, making the weld unacceptable for professional work.
If you don’t have the proper gas, you can get acceptable results only when you weld a single-pass stringer bead. The stainless bead will hold great in non or low-corrosive environments.
The spray transfer is used for thick metals. Spray mode needs a strong 240V welding machine with high amperage to use it. But you cannot weld in vertical or overhead positions.
If you want to use the spray transfer, you select shielding gas with:
- 1-2% oxygen (O2) and the remaining argon for the best results or
- 2% CO2 and 98% argon, that’s easier to find.
The globular transfer is avoided with stainless wires because it uses CO2 gas and causes too much spatter.
There is also the pulsed transfer. It is like spray transfer, but it uses two different amperages. One is strong enough to transfer weld metal. The other only keeps the arc lit.
The pulsed mode welds all positions and thin metals. But you need an expensive machine to use it. You use the same gases as the spray mode.
When you use a stainless wire, you don’t want to use shielding gas with more than 2.5% CO2 to maintain corrosion resistance.
The rest of the article will be about short-circuited transfer mode with a tri-mix gas since it’s the most common scenario.
4. Gather the equipment you need
You need to gather all the necessary welding personal protective equipment:
- A welding helmet is the most crucial PPE. It lets you see your work and protects your eyes and face from the arc’s radiation (UV and IR light), sparks, spatter, and flying objects.
- Safety glasses protect your eyes from all flying objects, but also from UV rays if accidental arc strikes occur.
- A face shield is excellent when you clean and prepare the metals.
- Earplugs or earmuffs, especially if you use an angle grinder.
- Thick welding gloves protect your hands from UV light, sparks, spatter, and hot metals.
- Fire-resistant clothes that cover all of your body. Never wear synthetic clothes.
- Leather boots. Grinding sparks and welding spatter can easily destroy synthetic shoes and give you severe burns.
- A welding respirator with P100 filters.
Another issue to keep in mind is that everything that touches carbon steel must not touch stainless steel. The stainless part will be contaminated with iron particles, and it may start to rust, depending on the environment.
As a result, you need a separate set of tools, for example, the wire liner, wire brush, grinding and cutting tools, etc.
Furthermore, ensure that all grinding wheels, discs, wire brushes, etc., specifically mention they are suitable for stainless steel.
Do a quick safety check to avoid surprises that might harm you or your work. For instance, exposed electrical wires, gas connections, a well-ventilated area, enough lighting, etc.
5. Clean both metals to avoid defects
MIG welding is a process that requires clean metal to offer good welds. Impurities will cause many defects. For example, porosity, brittleness, lower the corrosion resistance, etc. A clean joint also generates fewer fumes.
Therefore, you should remove all foreign materials. Let’s see how to clean each one of those metals.
Stainless steel
Stainless steel doesn’t have rust or other stains, but it may be covered with oil or grease. You can remove them with a rag soaked in acetone or, even better, an alcohol-based cleaner.
Also, if you cut the parts with a plasma cutter, the surface will have oxides that can restrict the puddle’s flow. The sides will also form burrs that concentrate dirt.
To remove oxides or dirt, you can use:
- A stainless wire brush can remove dirt at slow speeds but keeps the metal cool.
- An angle grinder with the proper flap wheel for stainless. But avoid keeping it steady on one spot to prevent discolorization.
- Sandblasting with clean silica sand for quick results. However, sandblasting can damage polished or thin stainless steel.
- There are also chemical ways. Always choose mild cleaning products to avoid breathing harmful vapors.
As mentioned, you must not use a contaminated tool on the stainless part. If that happens, use a chemical cleaner to remove the free iron.
Finally, if there is moisture on the steel, remove it with a flame torch or hot air. Moisture will release hydrogen and oxygen that will cause inclusions and porosity.
Mild steel
On the other hand, all short of unwanted materials may cover the mild steel part, such as:
- Mill scale, a superficial mixture of iron oxides created when the steel went through hot rolling. Here is a detailed article on how to remove mill scale.
- Rust is another form of iron oxides created in the presence of moisture or water.
- Mild steel is often painted to protect it from rust.
- There is also the case of galvanized steel. A galvanized surface contains zinc that has a low boiling point and releases a large amount of fumes.
A tri-mix gas is sensitive to surface impurities, resulting in poor puddle flow and porosity, among other defects.
Sandblasting, an angle grinder, or a simple wire brush are common methods to clean mild steel.
You can also use chemical ways, considering their safety issues. Since mild steel is often covered with hard-to-remove dirt, many people use chlorinated chemicals for fast results.
Chlorinated chemical products, especially in the area where you weld, are a terrible idea. The arc can convert chlorine vapors to even more harmful gases. Residual chemicals on steel can also generate these gases.
For best results, clean the area next to the joint at least 1″ (25.4 mm).
If the mild steel is galvanized, remove the coating at least up to 2″ (51 mm). All impurities can cause hot cracking and porosity to stainless weld metal, especially zinc.
Prepare the mild steel part away from the stainless one to avoid free iron particles.
6. Prepare a tight symmetrical joint
You want to have a symmetrical fitup. It’s easy for irregular joints to blow through at the wider or thinner parts, especially if one part is stainless steel. Furthermore, try to weld in the flat position if possible.
Preparing the joint is not hard. Joint design is similar to mild steel welding. But try to make a joint that needs the least amount of weld metal.
Some examples:
- When making a butt joint, it would be best not to leave an open root for thin sheet metal up to 14ga (2 mm).
- After that, the root gap should be as narrow as possible. For 1/8″ (3.2 mm) metals, leave a narrow 1/32″ (0.8 mm) gap.
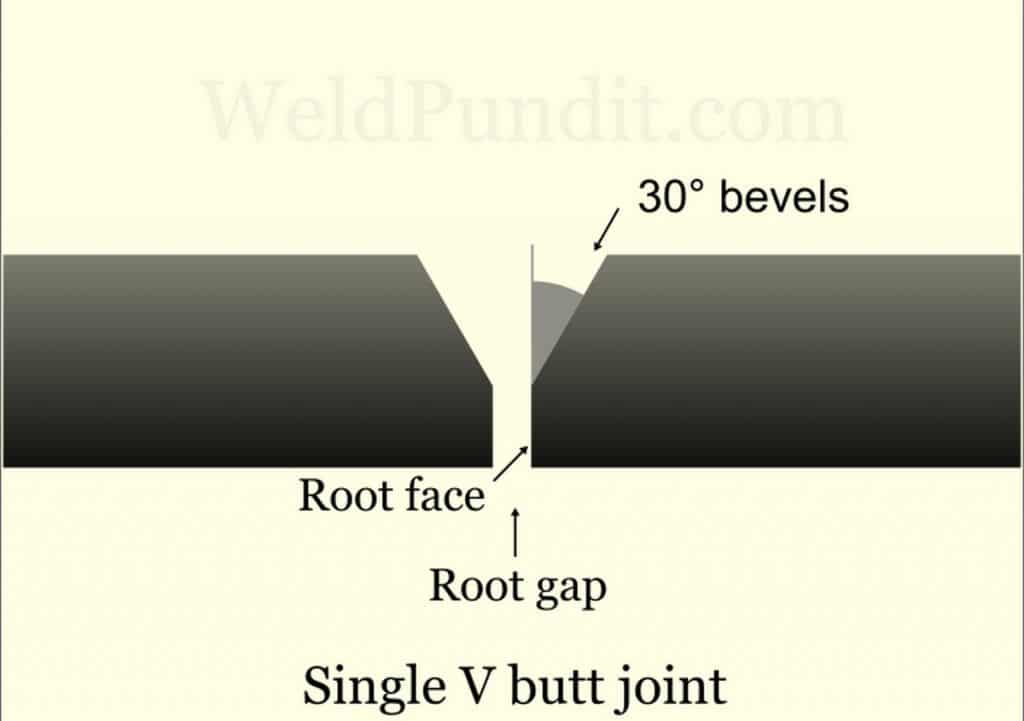
- If the metals are 3/16″ (4.8 mm) thick, make a single V joint by beveling the two parts at 30 degrees. Leave a narrow 1/16″ (1.6 mm) root gap and a 1/16″ root face.
An angle grinder with a dedicated flap disc for each metal is great for beveling.
If you want to use the spray mode and weld thick metals, make a double V joint since it requires less weld metal. But a double V requires welding on both sides.
At this point, it would help to clean the joint again to remove leftover iron impurities.
7. Use chill bars and clamp the metals
With MIG welding, you can weld thin stainless to mild steel parts down to 18 ga (1.2 mm) or even less.
But as mentioned, the stainless part is easy to warp, blow through and lose corrosion resistance if you overheat it.
A backup chill bar under the joint is recommended when welding thin stainless and is necessary if it’s thinner than 14 ga (2 mm). A copper or aluminum bar will absorb heat at fast rates and cool down the component.
Copper is more efficient than aluminum. But if the metals are thin or you have an open root, copper can react with the hot stainless part. This can lead to corrosion problems.
To avoid this problem, it would be best to:
- Insert a thin nickel sheet between the workpieces and the chill bar.
- Use a grooved copper chill bar to avoid contact under the joint or
- Use an aluminum chill bar.
If possible, you can also place chill bars on the metals right next to the joint’s heat-affected zone (HAZ). The HAZ is the area next to the joint that gets affected by the welding heat.
After you position the chill bar and the metals, clamp them on the welding table to keep them in place.
8. Set the correct voltage and wire speed
The stainless component wants the lowest amount of heat to avoid numerous defects. Furthermore, the mild steel part also needs low heat, to avoid contaminating the weld metal with carbon.
To control the heat, you want to set a low amperage that will properly melt the stainless wire and lightly fuse with both metals.
In MIG welding, the amperage depends on the wire diameter and the wire speed.
When you select the correct wire speed for your wire, you choose the correct voltage to melt the wire properly.
However, you must not set an amperage that is too low. The puddle must be easy to control, fill the edges, and offer a flat bead.
While there are many charts online for the correct wire speed and voltage, every welding machine welds a bit differently. Every manufacturer optimizes the settings for each machine they make.
Many MIG machines have the voltage and wire speed for each wire diameter and metal thickness imprinted on them. You can also find them in the manual or the manufacturer’s internet site.
As an example, to weld 14ga (2 mm) thin metals with a tri-mix gas, you can use:
- A 0.30″ (0.8 mm) ER309L wire.
- A short wire stickout no more than 3/8″ (10 mm).
- Wire speed of 190 ipm.
- A voltage of 22V.
- And a gas flow of 20-25 cfh.
Another factor that determines how much heat goes into the metals is the traveling speed. When you use stainless wire, you always weld at a faster speed.
9. Set the inductance
Inductance is helpful with the short-circuit mode because it controls how long the arc stays on at each short-circuit. High inductance makes the arc last longer, resulting in a hotter arc.
Inductance is helpful with stainless wire to improve the sluggish weld metal. With a high setting, you have a flatter bead with less spatter and improved toe fusion.
If your welder doesn’t have an inductance control, the manufacturer has set an embedded value that you cannot change.
10. Stainless to mild steel welding needs a modified working angle
Passing the bead on a stainless to mild steel joint is like typical stainless welding with one main difference. You point the wire slightly more on the stainless component. As a result, the final bead will be symmetrical with good fusion at the toes, no matter the uneven working angle.
For instance, for a fillet weld, try an angle closer to 60-degree pointing more on the stainless side instead of a typical 45-degree angle. Always experiment on similar scrap metal first.
The traveling angle remains short at 5-10 degrees.
11. Tack the metals to avoid distortion
Finally, before you start welding, you tack weld the joint to keep it symmetrical and prevent warping.
Tack thin metals every 2″ (51 mm) to avoid warping. If you weld sheet metals, tack every 1″ (25.4 mm), but make the tacks smaller.
Tacking length depends on the thickness: the thicker the metals, the longer but larger the tacks.
12. Tips for MIG welding stainless to steel
Here are some helpful things to keep in mind:
- Remember that when you weld with an austenitic wire, you don’t need preheating for the majority of the metals. When you weld austenitic steel, you do not preheat the metal. Preheating damages austenitic steel (304).
- If you want to weld outside, put windbreak screens around your work to protect the shielding gas.
- A tri-mix gas is more sensitive to wire stickout changes than an argon/CO2 gas blend. So keep the distance as steady as possible.
- Attach the working (or ground) clamp on the stainless part for improved arc stability. This is very important when MIG welding.
- When dealing with stainless, pushing the torch is better. It offers improved gas coverage, lower penetration, and better visibility.
- You should avoid starting the arc on the metals, but in the joint or on the previous beads. You don’t want arc strikes on the stainless part. They will leave scars and damage the corrosion resistance.
- Prefer straight beads (stringers) without weaving the torch for faster speed thus lower heat input. If weaving is necessary, try to keep it as narrow as possible.
- Always fill the ending crater. If there is a gap, the shrinkage forces can crack the bead.
- If you are having trouble with distortion, peening the bead can help. Peening is when you hit the bead with a rounded hammer when it’s red-hot. It helps to counter excessive shrinkage.
It’s best to avoid multipass welds by using correct joint preparation and a tight fitup. If multipass welds are necessary, wait until the previous bead cools down.
If you have a large joint, multiple overlapping beads with an ER309 wire can lead to cracking caused by excessive nickel. But only if the weld serves under harsh conditions, especially high heat.
To avoid this, you weld the surface of the mild-steel component with an ER309 wire. This is called the buttering technique.
After that, you use a matching stainless wire to fill the joint. For example, the ER308L for the 304L steel or the ER316 for the 316 steel.
13. Clean the stainless part and bead after welding
MIG welding creates a good-looking bead and low spatter, but you often want to improve it.
Also, cleaning the final bead and the stainless HAZ prevents corrosion, especially in harsh environments. Any residual spatter, iron, etc., will act as corrosion concentration points.
To remove spatter and make the bead flatter, you can grind it using a 40-60 grit flap disc.
After that, you can use a scotch brite disc to create a smoother surface. Be careful not to touch the mild-steel part to avoid iron particles.
If necessary, you can remove discolorations in various ways:
- Mechanically by using low-speed tools with mild polishing abrasives and paste. However, you cannot reach tight areas.
- Chemically with mild phosphoric acid solutions or equivalent commercial cleaners for stainless steel. Avoid traditional pickling chemicals or pastes because they contain harmful chemicals.
- Electrochemically that combines weak acids and the help of low-voltage electricity. It’s an efficient, safe, but expensive method. It’s also called electropolishing.
More Weldpundit articles
Can you MIG weld stainless to mild steel with normal wire?