How to TIG Weld Cast Iron: With and Without Preheating
You will learn what settings and consumables you need to TIG weld cast iron and the steps you must take with and without preheating, after reading this article.
As a bonus, we’ll see a great alternative to join or repair cast iron with the same TIG equipment.
Weldpundit already has an introductory article on how to weld cast iron if you are a beginner on the topic.
Table of Contents
- Why is TIG welding cast iron hard?
- What TIG welding rod is the best for cast iron?
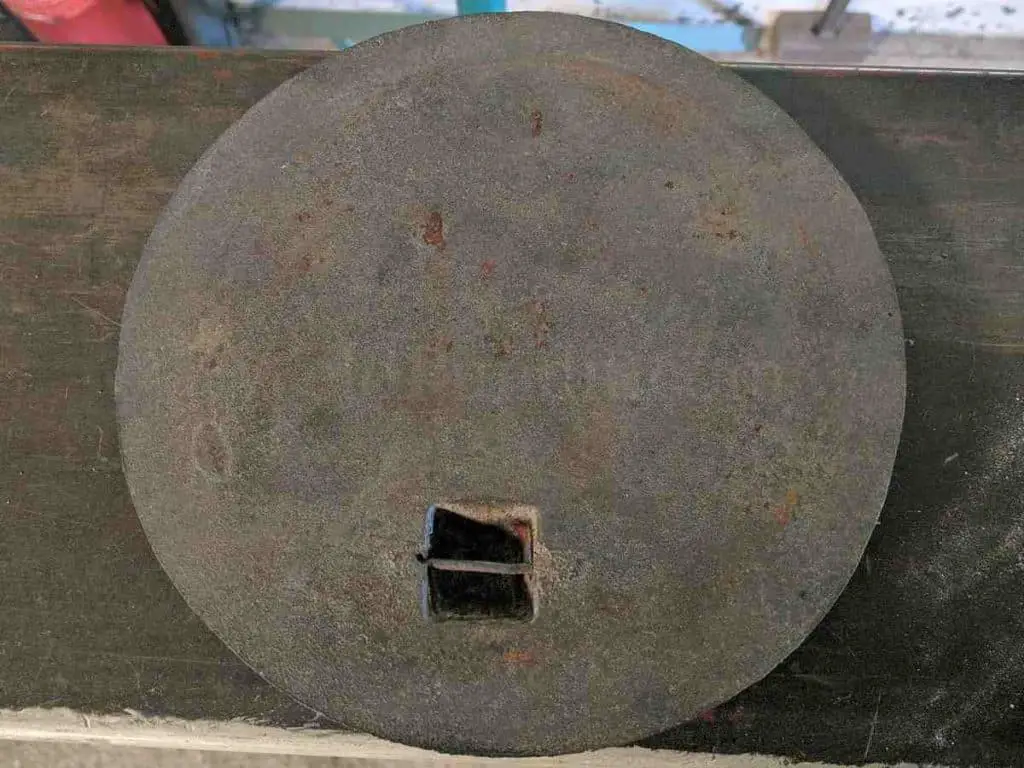
- 1. Identify the cast iron type
- 2. Clean the casting’s surface
- 3. Prepare the joint
- 4. Preheat the casting to avoid temperature differences
- 5. Weld short beads to avoid concentrated heat
- 6. Peen each bead to prevent shrinkage stress
- 7. Post heat the casting to fix temperature differences
- 8. Protect the casting so it can cool down slowly
- How to TIG weld cast iron without preheating
- A great alternative to fusion welding
Why is TIG welding cast iron hard?
Cast iron is hard to weld because it is brittle, and the welding heat can cause fast expansion and contraction. That leads to cracking.
Therefore, it’s critical to avoid putting high amounts of heat in a short time. You can TIG weld cast iron, but there are some difficulties.
Cast iron is hard to TIG weld because this process demands perfectly clean joint and filler rods to avoid welding defects. Cast iron comes with numerous impurities, both inside and on the surface. Furthermore, TIG is a difficult process, and you must have sufficient expertise before welding cast iron.
TIG welding (or GTAW) needs clean metal for acceptable welds. Even small amounts of contaminants in the puddle or the arc will cause defects such as porosity, inclusions, high arc instability, etc.
Cast iron, especially low-quality ones, contains inclusions and unwanted elements, for example:
- Large amounts of sulfur and phosphorous.
- To lower the costs, the manufacturers add dirty scrap metal into the blast furnace.
- The casting method creates air gaps in the casting.
- Various oxides on the casting’s surface (casting skin).
- Often oil and grease have penetrated the porous surface.
Perfectly cleaning old or low-quality castings is hard, time-consuming, and still can give you poor results. You will have better luck if you weld new and high-quality castings. Or change the process and stick weld cast iron that is more suitable for dirty castings.
TIG is the hardest process to learn, even for easy-to-weld metals such as mild steel. It is a manual process that needs both hands plus one foot if you use a pedal and excellent hand-eye coordination. You need to weld steel efficiently before you try to weld castings.
An advantage of TIG is that you can weld thin castings with a lower cracking risk than stick or MIG welding.
What settings do you need?
TIG welding cast iron needs almost the same torch setup and settings as steel. However, you want to set a lower amperage that will effectively melt the rod but will form a small puddle.
This way, you will prevent:
- Deep penetration to avoid cracking from rapid expansion or contraction.
- Carbon and other impurities from entering the puddle.
- A wide heat-affected zone (HAZ). The HAZ is the area next to the welded joint that gets harder and more brittle when you weld. It is where most of the cracks appear.
Of course, you must not set the heat too low. The puddle must be easy to control, and the weld metal must fill the edges.
Furthermore, a wider cup for better gas coverage is helpful because:
- You will use nickel rods that give sluggish weld metal and poor fluidity.
- There may be residual impurities after cleaning that restrict the weld metal’s flow.
You can also use a foot pedal to change the amperage while you weld according to your judgment.
Also, modern TIG machines can output pulsed current to achieve penetration with less heat.
These last two make welding castings easier but aren’t necessary for most jobs.
What TIG welding rod is the best for cast iron?
The best TIG rod for cast iron is the nickel-based ERNiFe-CI (or ERNi55). This rod doesn’t shrink much and has high tensile strength and ductility (elasticity). With it, you can weld most cast-iron types, somewhat dirty castings, and cast iron to steel. Finally, the weld metal has good machinability.
Nickel-based rods are the proper filler metal for cast iron. This is because nickel weld metal doesn’t shrink much and stays ductile. This prevents pulling the casting, something that causes cracking. Nickel also resists carbon absorption.
The ERNiFe-CI rod has 55% nickel (Ni), a small amount of various other elements, and the rest is iron (Fe). It has a high enough tensile strength (90ksi) to weld most ductile iron grades.
The ERNiFe-CI also has high ductility to weld cast iron to carbon or stainless steel. It is suitable for multi-pass welds.
Furthermore, because nickel resists carbon absorption, the weld metal stays machinable, so you can drill it or cut it.
However, if too much heat enters the casting, an amount of carbon may combine with iron and form carbides. Carbides are exceptionally hard and lower the metal’s machinability.
The next best rod is the ERNi-CI (or ERNi99) which is almost pure nickel with a tiny amount of alloying elements. Use it when you want 100% machinable weld metal since it is weaker and more expensive than the ERNiFE-CI.
The ERNi-CI doesn’t have enough tensile strength to weld most ductile irons, so it is more suitable for gray and malleable iron.
This rod cannot tolerate high amounts of sulfur, phosphorous and other impurities found in low-quality castings. As a result, the bead may crack longitudinal when it cools down. We call this hot cracking.
Another rod you can use is the ERNiCu. Instead of iron, it contains copper (Cu) offering high ductility and corrosion resistance.
However, copper may absorb carbon. To avoid this, ensure the lowest possible penetration to avoid hot cracking.
With nicker rods, you don’t need preheating if the casting is small or needs a minor repair.
Can you TIG weld cast iron with mild steel rods?
It is possible to TIG weld cast iron with mild steel rods such as the ER70S-6 but it is not recommended. Since there is no nickel in steel rods, carbon from the casting will migrate in the weld metal, making it extremely brittle with a high shrinkage rate. When the bead cools, or the casting comes under mechanical or thermal stress, it is very likely to break.
Nickel rods are very expensive and hard to find. For this, you can try to weld with typical steel rods and get acceptable welds for simple repairs on low-cost castings. Still, it’s not wise for critical welds, expensive or irreplaceable castings.
To lower the risk of failure, you want to follow all the welding steps correctly without mistakes. Furthermore, steel rods need much higher preheating.
The weld metal will not be machinable. It will be impossible to drill or cut it. Furthermore, you may or may not be able to grind the bead depending on how much carbon is absorbed.
Can you TIG weld cast iron with stainless steel rods?
TIG welding cast iron with stainless steel rods is not recommended. Chromium from the rod and carbon from the casting will form carbides that are even harder than every iron type. Furthermore, stainless steel has a much higher tensile strength and shrinkage rate that can pull and crack the casting.
Stainless steel rods, such as the ER309 or the ER312 are popular for hard-to-weld metals. But the ultra-high carbon content in cast iron is a problem. A bead that contains chromium carbides will shrink and crack when it starts to cool down.
If you want to avoid expensive nickel rods, you should at least acquire a couple of them. You can remove the flux of nickel stick rods and use them. With them, weld the surface of the joint. We call this buttering. After that, you can fill the joint with ER70S-6 or ER309 rods. Buttering will offer welds that will last, but it is suitable only for non-critical welds.
In the second part of the article, let’s see step by step how to TIG weld cast iron with preheating.
1. Identify the cast iron type
Gray iron is the most common type, but it is brittle with many impurities, making it hard to TIG weld. Malleable iron is ductile and easier to weld. Ductile or nodular iron has a low amount of impurities that help the TIG process. White iron is not weldable, it always cracks.
Furthermore, each type has many classes. Each class has a different hardness, tensile strength, ductility, etc, making things harder. Identifying the class is hard and needs chemical analysis.
Weldpundit already has an article about how to identify metals, but here are the basics to figure out what type you have.
A spark test is an excellent method to identify metals, but you must have identified sample metals to compare them.
In a nutshell, the hard and brittle gray iron has short and reddish sparks, but the ductile irons have longer and yellowish sparks that look more like steel sparks.
If you have a broken part, gray iron has a characteristic dark-gray color. Malleable iron has a white, steely surface but gets gray towards the center. Nodular iron’s color is more similar to gray iron.
You can distinguish gray iron from ductile irons with a hardness test:
- Use a center punch and a hammer on it. If the crater that you created has a smooth surface, it is gray iron. If the crater has a burr, it is a malleable or nodular iron.
- You can also drill the casting. If the chips are like powder, it is gray iron. If they are somewhat continuous, it is ductile iron.
- If the chips are long and very ductile, you probably have cast steel.
If you cannot drill the casting, it is hardened by the manufacturer, the service conditions, or by former welding. If so, it is too hard to weld it with success.
However, if it is localized, then you can remove the affected area before proceeding.
Since gray iron is the most popular, the rest of the guide will be about this brittle metal.
2. Clean the casting’s surface
This is a crucial step since TIG needs clean joints to offer good welds.
Hard-to-weld metals also need a clean surface to reduce the risk of failure, and cast iron always has impurity problems. To make things worse, oil and other contaminants may cover the surface. Oil can also penetrate the casting.
If the casting has absorbed oils, cleaning with acetone or similar products will not be effective. Use a mild degreaser that does not contain chlorine. Chlorine is poisonous by itself, but the welding heat and the arc’s ultraviolet rays convert chlorine to other hazardous gases.
Read the product’s description to verify that it is not chlorinated and the how-to-use instructions.
The trade-offs of nonchlorinated products are that they are more expensive and quite flammable.
Another, more effective way to remove residual oil is by preheating the casting to 750 °F (400 °C) for 15-30 minutes. This way the oil, and other impurities will burn out. But it’s costly.
If your casting is free from oil, you must remove surface contaminants such as the casting skin, rust, paint, etc. You can use sandblasting for quick removal, but it can leave contaminants on the surface. If you use an angle grinder, don’t focus on one spot to avoid discoloration.
Clean both sides at least 1″ (25.4 mm) to bright metal to keep impurities away from the puddle. After sandblasting or grinding, use a file to remove residual carbon and other contaminants on the joint.
Finally, clean the joint and the rod with acetone or, better yet, an alcohol-based cleaner to remove any remaining contaminants, including those that are invisible.
If you weld clean cast iron and porosity appears, it is because there are impurities deep inside the casting. The welding heat brings them to the surface. To fix this, you remove the bead and reweld until you get a bead without porosity. The buttering technique, described earlier, can seal these impurities, saving you the trouble of rewelding.
3. Prepare the joint
The best way to prepare a joint or remove a crack on cast iron is with a chisel and a hammer.
This way you:
- Avoid contaminating the porous casting with abrasives.
- Keep the casting cold.
- Do precise work since it’s a slow process.
- It is safer than grinders.
After that, you can use a die grinder with carbide burrs. Carbide burrs remove metal fast, without leaving residual abrasives or carbon.
You can use an angle grinder, but move it evenly over the area and avoid focusing on one spot. Grinding generates high heat that can locally harden the metal. When you finish, use a file to remove residual carbon and abrasive material.
Ensure that the joint will be as symmetrical as possible, and always try to weld in the flat position.
Nickel filler metal is sluggish, and each bevel you made needs to be at least 35 degrees. Furthermore, a wider groove will make it simpler to fit the TIG torch.
Removing cracks
You must remove all cracks because the expansion and contraction forces will make them bigger if you weld on or next to them.
To remove a crack:
- Drill two holes at least 1/8″ (3.2 mm) wide and 3/16″ (4.8 mm) beyond the ends of the crack.
- Then, remove the crack by creating a V groove at a safe depth, up to 1/8″ (3.2 mm) from the bottom of the crack. There is no need to go deeper than that. The deeper the joint is, the more weld metal you need to fill it. That will put more heat into the casting.
- If possible, try not to leave an open root.
Broken parts
Because gray iron is rigid and brittle, broken parts fit perfectly with each other. Therefore, you can either:
- Fit and tack weld the broken part. After that, you can create a groove, just like fixing a crack.
- Create the bevels on both parts. Then tack weld the broken piece to the casting.
4. Preheat the casting to avoid temperature differences
Preheating prevents the fast expansion when you weld and the quick cool-down after welding. It also prevents carbon migration in the weld metal. With preheating, you decrease the risk of cracking.
Preheating adds another important advantage when you TIG weld. It removes impurities not only from the surface but at a deeper level too.
You can use an oven or a flame torch. The typical preheating temperature of medium-sized gray iron castings is 500 °F (260 °C).
If you preheat with a flame torch, move it over the casting and concentrate on the thicker parts. After a while, use the proper temperature stick on the surface to check the temperature.
If the stick melts evenly all over the casting, you are ready to weld. If not, continue preheating as necessary.
You can also use an infrared digital thermometer, but they are not as reliable, especially on shiny surfaces.
After preheating, you must weld the casting in a reasonable amount of time to prevent it from getting cold. If you use the temperature stick but it doesn’t melt, reheat the casting.
You must avoid cold drafts during welding to protect the preheating temperature. If the casting is big, insulate it with welding blankets or similar equipment.
If you hear tinkling noises, it means the casting is cracking. Chances are you didn’t avoid the temperature differences in the metal with enough preheating.
5. Weld short beads to avoid concentrated heat
Brittle metal needs very short beads. A long one will put too much heat at a fast rate.
The general rule is to weld 1″ (25.4 mm) beads. However, the length depends on the casting thickness:
- For a 1/4″ thick casting, you can weld a 1″ bead.
- For a 1/4 to 1/2″ casting, weld a 2″ bead.
- And for 1/2″ and thicker, weld a 3″ or slightly longer bead.
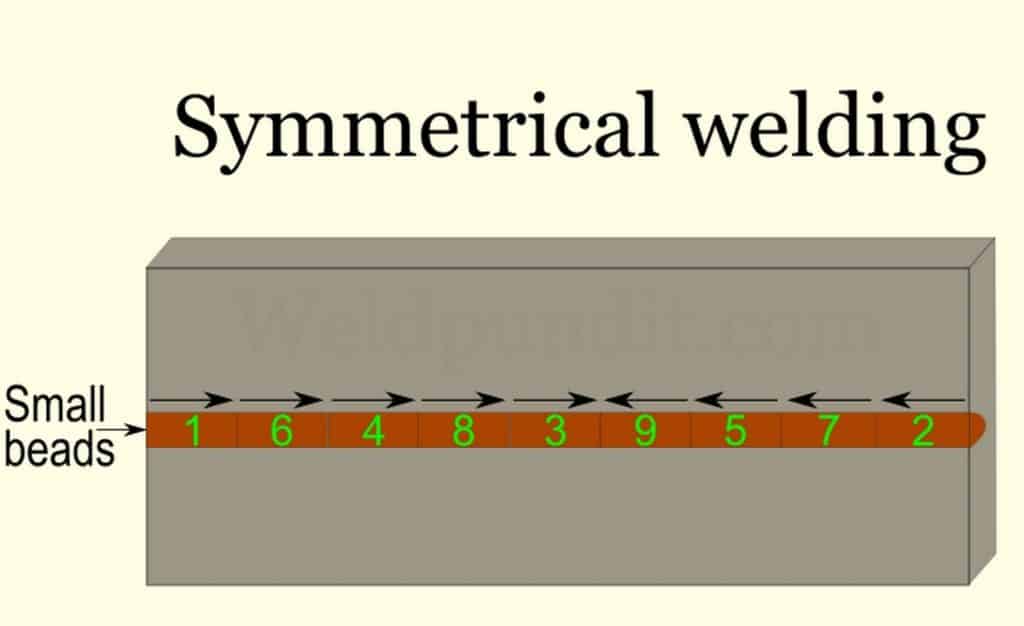
The heat that goes into the casting also depends on the way you place the beads. To reduce the cracking risk, you don’t place each bead right next to the other. Instead, you spread them along the joint to spread out the heat.
Below is an image with an example of how to spread the beads on the joint.
Some additional tips for better results:
- The traveling speed greatly affects the heat that goes into the casting. For this, you should travel as fast as possible without creating any defects from it.
- Weld straight beads (or stringers) without weaving the TIG torch.
- Avoid starting the arc on the casting, but in the joint or on the previous beads.
- Always fill the bead’s crater. If there is a gap, the shrinkage forces can crack it.
- If a crack appears when welding, stop and drill holes at both ends to stop it from expanding.
- If your casting is irregular, weld the thicker areas first.
- Put the working (or grounding) clamp on the casting for a better connection.
- Avoid all drafts since they will displace the shielding gas. TIG is very sensitive to atmospheric contamination. Also, nickel weld metal doesn’t wet out well, and lack of gas coverage worsens it.
- If you think it’s necessary, use pulsed current or a foot pedal to control the amperage when you weld.
Avoiding turning red-hot the area you weld is a reliable indication that you do not overweld the casting.
6. Peen each bead to prevent shrinkage stress
Peening is when you tap all over the red hot bead with a small rounded hammer immediately after welding it. Peening will stretch the bead and reduce the shrinkage forces.
As a result, the bead will have lower residual stress and cracking risk.
Start from the crater and use rapid blows that will lightly indent the bead. Hitting the bead too hard or for too long will harden it, making things worse. We call this work hardening.
You may also use a rounded chisel or an electric needle scaler with round needles.
7. Post heat the casting to fix temperature differences
After welding, you must ensure the casting has at least the same preheating temperature, spread out evenly. Use the temperature stick again and reheat the casting if necessary.
8. Protect the casting so it can cool down slowly
The final step is crucial to preserve the metal’s characteristics and prevent cracking. The slower you cool down the casting, the better.
For critical welds or valuable castings, you delay the cool-down rate even down to 50 °F (10 °C) per hour.
You should insulate the entire casting so to ensure a slow and even cool down until it reaches room temperature.
If you preheated the casting with an oven, use it again at lower temperatures to cool it down. Otherwise, you can cover it with welding blankets, similar fiberglass material, or dry sand.
In the third part of the article, let’s see how to TIG weld a casting without preheating.
How to TIG weld cast iron without preheating
There are many situations when you consider welding cast iron without preheating:
- The casting is too big or complicated to preheat correctly.
- The damage is short cracks or superficial wear.
- You don’t have the necessary preheating equipment.
- You cannot dismantle the part, and if you preheat it, it will crack.
- The casting is small and simple, and you want to avoid the trouble and the costs.
- You already have some experience welding cast iron.
You can TIG weld cast iron without preheating using nickel rods (ERNi99 and ERNi55), very short beads, and constant peening. The important step is to leave each bead to cool before welding the next one. However, no preheating will always make the weld weaker and more prone to cracking in the future.
Welding without preheating is also called cold welding. Keep in mind that stick welding is the best process to cold weld cast iron.
You also skip the post-weld reheating and the casting’s slow cool-down steps. This will save you effort, time, and money if the casting doesn’t crack.
The main concern is to minimize the heat input and the width of the heat-affected zone (HAZ) to the absolute minimum. To do this:
- Use only nickel rods made for cast iron.
- Use the lowest amperage to melt the rod properly and achieve low penetration.
- Weld 1/2″ (12.7 mm) to 1″ (25.4 mm) short beads without weaving.
- Always peen the bead when it’s red hot.
- After each bead, you stop and let the bead cool down until you can touch it comfortably with your bare hands. That’s around 100 °F (38 °C), but don’t let it drop lower. This step is the most important when welding without preheating.
- After that, you weld another short bead at a different area on the joint and repeat the cycle until you finish.
To control the heat input, use pulsed current if your TIG machine supports it. Or a foot pedal if you have one.
Skipping the preheating step doesn’t mean you can weld a cold casting. Welding in a cold environment will always give poor results. Instead, warm the casting to room temperature 75 °F (24 °C) before starting.
Keep in mind that lack of preheating is risky, and you should consider preheating when:
- The casting is very thick.
- Has demanding service conditions.
- Is expensive or irreplaceable.
- Is damaged in the center. Cracks or broken parts at the edges can be welded easier with less or no preheating.
Finally, let’s see a great alternative to join cast iron with TIG equipment.
A great alternative to fusion welding
With TIG equipment, you can use copper-based rods to braze weld cast iron. Braze welding uses the same equipment as typical (fusion) welding and similar joint design. The difference is that copper-based rods melt at a lower temperature than nickel rods. This way the casting doesn’t melt.
The most popular braze rods are silicon bronze (ERCuSi or SiB) and aluminum bronze (ERCuAl). ERCuAl has higher tensile strength (70ksi) than ERCuSi (50ksi). But it is more sluggish and doesn’t wet out well.
Advantages
TIG brazing has numerous advantages for cast iron:
- Since the casting doesn’t melt, there is no puddle. That makes braze welding far better to join cast iron, since it releases a lower amount of heat. The casting doesn’t get harder, and there is low development of shrinkage stress. As a result, there is a much lower cracking risk.
- This process needs a lower preheating than nickel rods, or no preheating at all.
- You can join cast iron to other metals easier than nickel rods.
- Braze rods are cheaper than nickel ones.
- Finally, it is faster and easier than fusion welding.
If you have a TIG machine that can output alternating current (AC) (allaboutcircuits.com), use the aluminum bronze (ERCuAl) rod with the AC balance control.
This is a significant advantage because the reverse polarity (DC+) will clean the aluminum oxide that forms in the brazing weld metal. This oxide prevents smooth wetting and makes the bead weaker.
The added strength allows the repair of larger castings with low cracking risk.
The cleaning effect of AC will not only make the bead stronger but prettier too.
Disadvantages
Now let’s see the disadvantages of TIG brazing:
- Because braze welding does not penetrate the casting, it lacks the strength of fusion welding. Even if a braze and a welding rod have the same tensile strength, fusion will always give a stronger joint. If the casting you weld has demanding service conditions or is very big, it would be best to weld it.
- Braze weld metal has low-heat resistance. When a copper-based bead reaches 930 °F (500 °C), it loses a lot of strength and will not hold the joint. Critical welds that reach temperatures of 400 °F (200 °C) or higher should be fusion welds.
- Furthermore, TIG brazing needs an even cleaner joint, especially if you work with gray iron.
- Finally, copper-based beads always have a goldish color, which may not be acceptable.
Weldpundit has an article that discusses when it is better to braze or weld cast iron in more detail.
More Weldpundit articles